How to Make Upload Source Code for a Programming Blog in Wordpress
Wondering how to permit your website visitors upload file attachments to your WordPress forms?
Giving users the ability to upload documents and media to your WordPress site can make it way easier for you to collect the data you demand.
In this article, we'll show yous how to easily create a WordPress file upload form using the WPForms form builder plugin.
Click Here to Make Your File Upload Form At present
Here's a table of contents with all the necessary steps for uploading documents to WordPress using WPForms:
- Install WPForms on Your WordPress Site
- Add a New Grade Using WPForms
- Customize the File Upload Form
- Switch to the Classic Style File Upload Field (Optional)
- Customize Your File Upload Form Settings
- Configure Your File Upload Form'due south Notifications
- Configure Your File Upload Form's Confirmations
- Add Your File Upload Class to Your Website
- View The Files
Why Use a WordPress File Upload Field on Your Forms?
Depending on the type of information you want to collect on your form, using a file upload field is one of the best means to make it easier for you to get more info from your users speedily. And, making forms easier to fill up out helps reduce your course abandonment charge per unit so your site can generate more than revenue.
WPForms is the best WordPress Form Builder plugin. Go information technology for gratis!
Y'all might need to add a file upload field to your WordPress forms so users can upload documents to WordPress besides as other types of files and media equally they submit their forms to y'all.
Here are some of the virtually common situations where y'all might desire to allow users to upload a file through your contact form:
- Job awarding forms so applicants can attach their resume files
- Pictures equally prototype files for a contest or for use if using a giveaway plugin
- User submitted content forms so users can attach a web log mail or paradigm they want to share (WordPress frontend file upload)
- Client services forms and so clients tin can attach their spreadsheet or projection spec document
- Customer support forms so customers can adhere documents to provide additional information
- Sound clips for you to playback during your podcast
- CSV file uploads then visitors tin send you orders or timesheets
- File upload forms with a Stripe field and then you can take documents and payment together
- Order forms or sponsor forms where you lot desire to require payment with the file upload
- User-submitted videos on an event registration form so you have content to play at your event (great for weddings, anniversaries, and fundraisers.)
- Works groovy with WooCommerce plugins.
And this is just the beginning of what your WordPress file upload course plugin tin can do.
Luckily, the WPForms is i of the easiest to use WordPress file upload plugins and makes it piece of cake for your site visitors to upload all kinds of file types to your contact forms, including but not limited to:
- Documents (.physician, .xls, .ppt, and .pdf)
- Images (.png, .gif, and .jpg)
- Video (.mpg, .mov, and .wmv)
- Audio (.wav, .mp3, and .mp4)
And so if yous were asking yourself how to add a document to WordPress, WPForms is the perfect style to do just that.
For WordPress security reasons, the default file types that can be uploaded are limited. Hither'south how to allow additional file upload types to your forms, including Adobe Illustrator file uploads.
So, let's go alee and bank check out how to add the file upload field to your WordPress contact grade.
How to Create a WordPress File Upload Form
Follow these steps to fix your online file upload course.
Prefer written instructions? Check out the steps beneath:
Step one: Install WPForms on Your WordPress Site
The showtime thing yous'll demand to do is install and activate the WPForms plugin. Creating a WordPress contact class with a file upload field is extremely easy with WPForms.
To get WPForms, caput over to WPForms' pricing page and purchase a plan (you need WPForms Pro or above plan to go the file upload template).
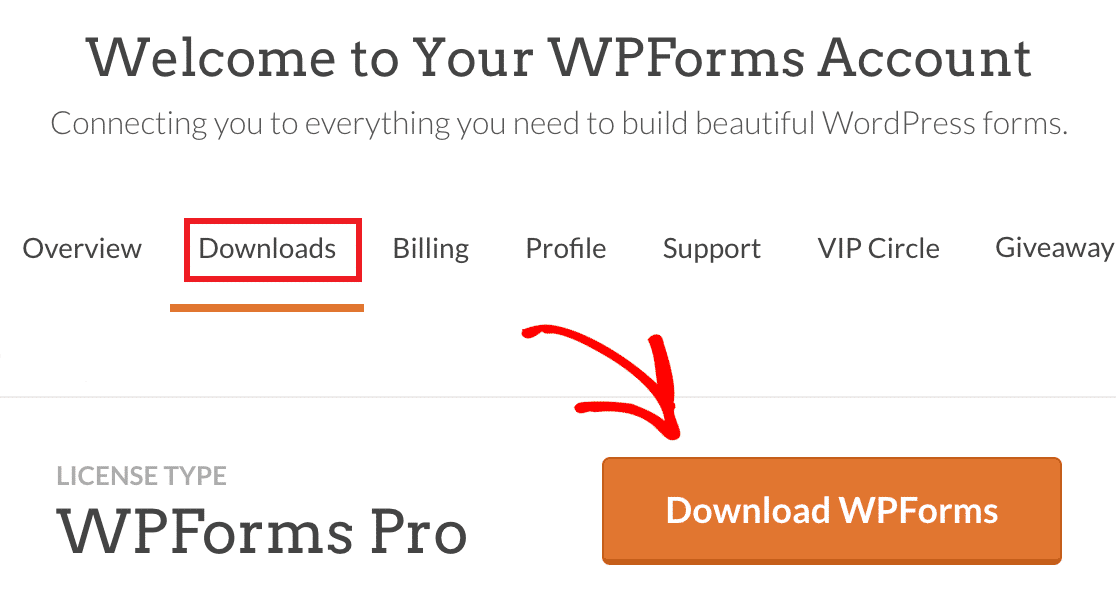
After you've registered your account and purchased the plan, click on the Downloads tab on the top of your WPForms account area. And so, press the Download WPForms button.
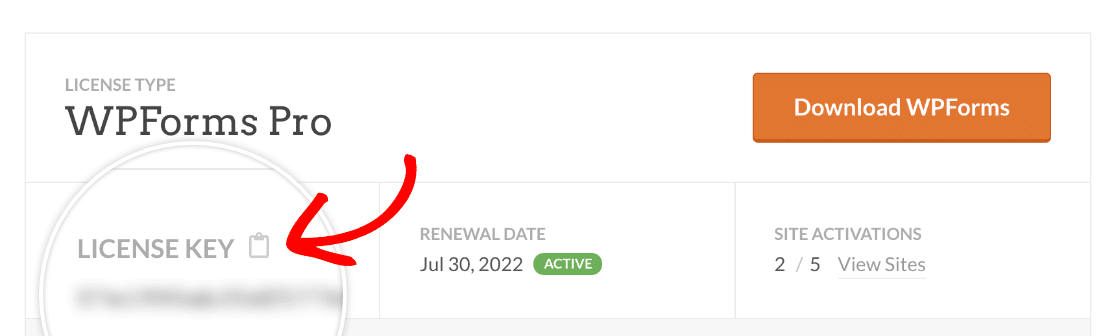
While you're on this page, also make sure to copy the license central. You'll need this before long in one of the steps below.
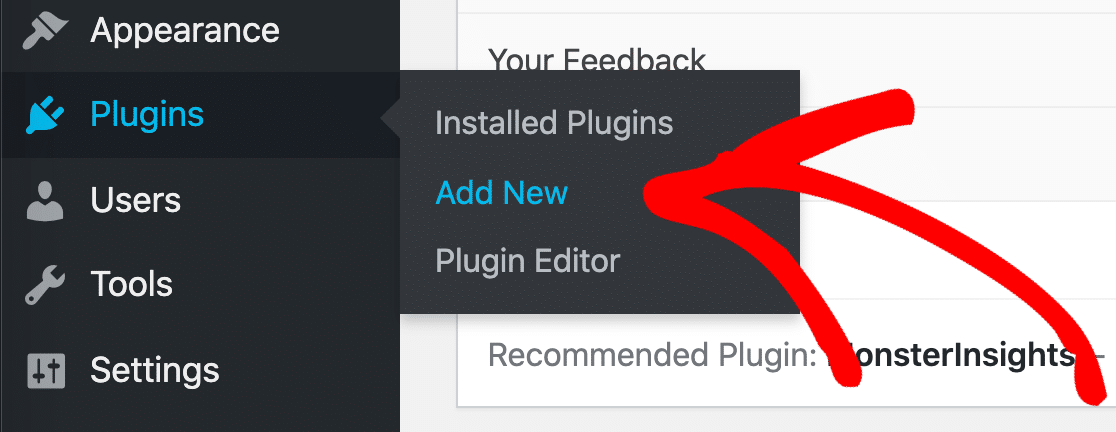
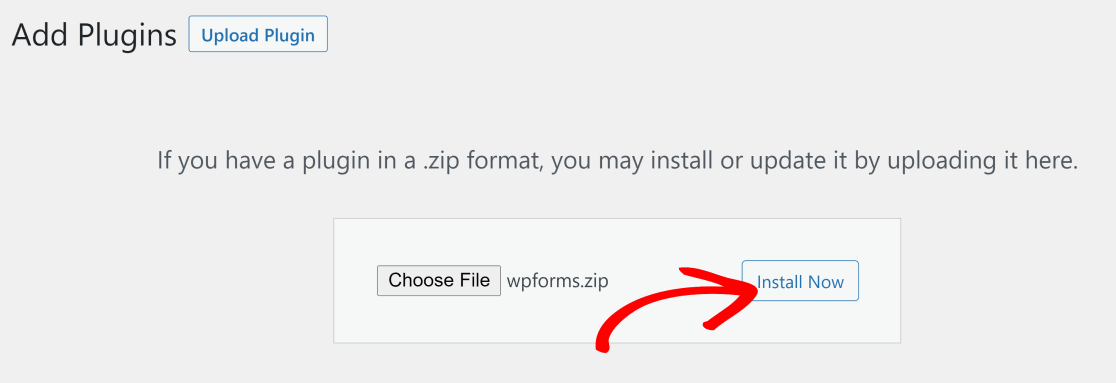
When the file has downloaded, open up your site's WordPress business relationship dashboard and click on Plugins » Add Newfrom the left-manus menu.
And then, click on Upload Pluginand press the Choose File button. Discover the downloaded WPForms zip file within your directory and and so printing the Install Now button.
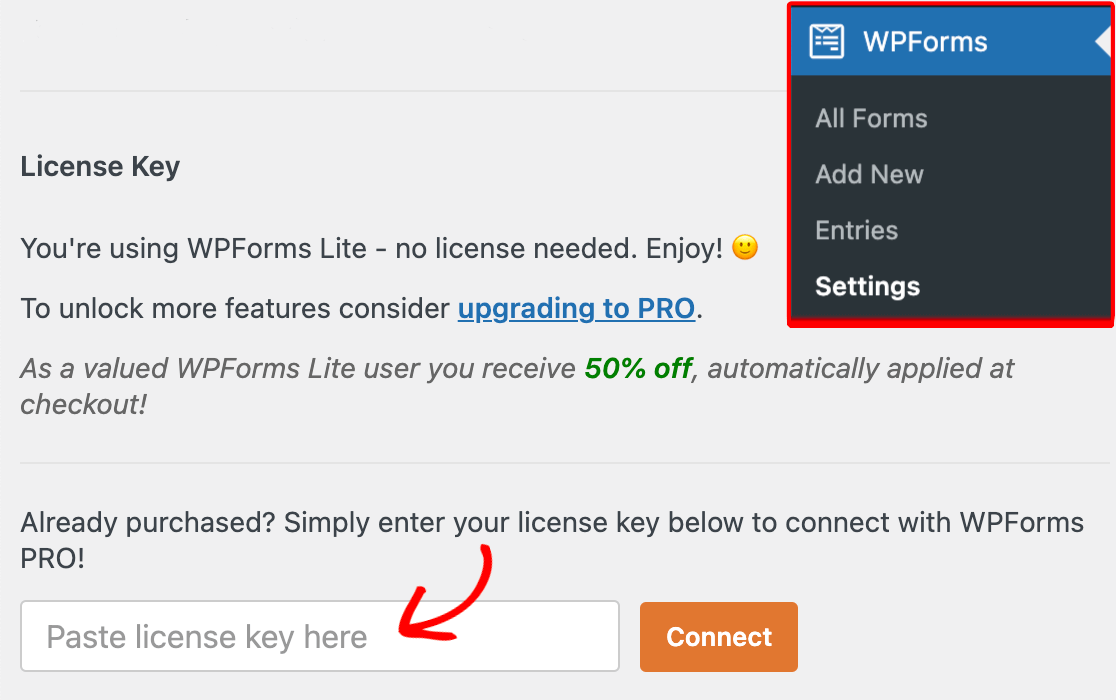
Activate the plugin once it's installed. You'll now come across WPForms added to the left hand panel of your WordPress site. Click on WPForms » Settings.Now, in the License Key field, copy and paste the WPForms license key that y'all establish earlier.
Now, nosotros can brainstorm creating our file upload course.
Step 2: Add a New Grade Using WPForms
Adjacent, get to your WordPress dashboard and click on WPForms » Add New in the left-hand panel to create a new form and proper noun it whatever you'd like.

At present, we'll use ane of WPForms' pre-built templates to make our file upload grade.
Scroll downwards and type in "file upload form" in the template search field. When this template appears in the results, motion your cursor over it and press Utilize Template.
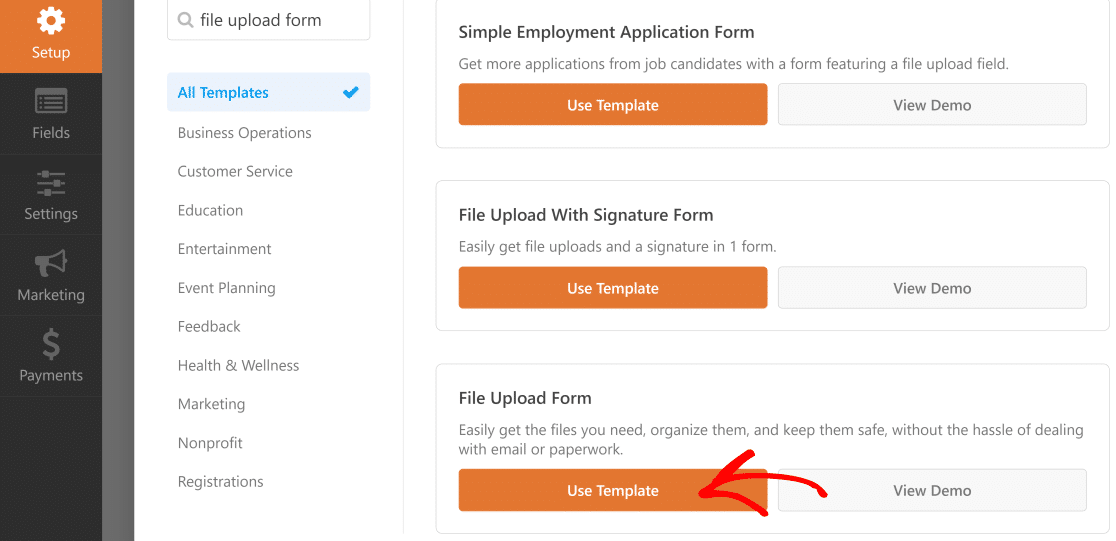
Now, WPForms will populate a pre-built File Upload Grade and display the drag and drop builder.
Now, we can customize our WordPress file upload course until it looks exactly how nosotros want it to.
Pace 3: Customize the WordPress File Upload Form
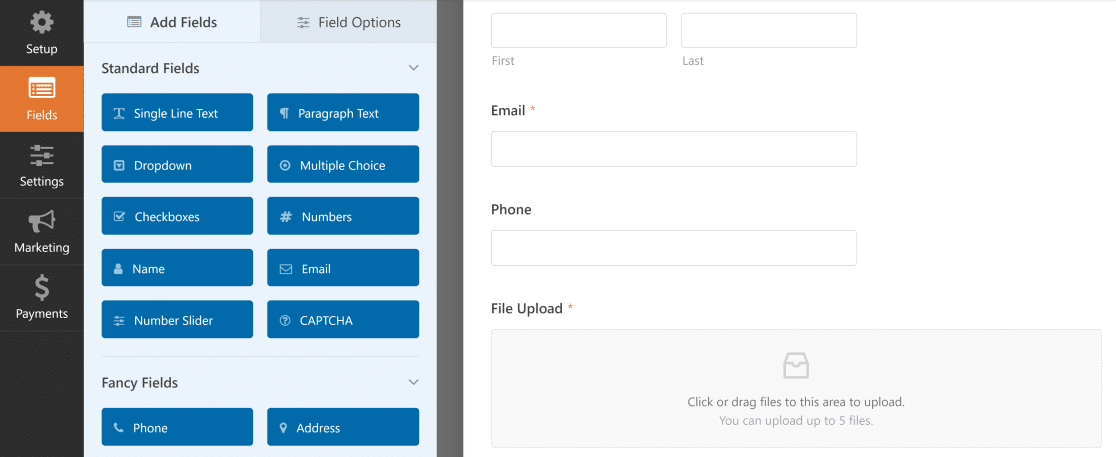
Here, y'all can add additional fields to your contact form past dragging them from the left-mitt panel to the right-hand panel. For example, you tin add a payment field if you want to require payment on your file upload forms.
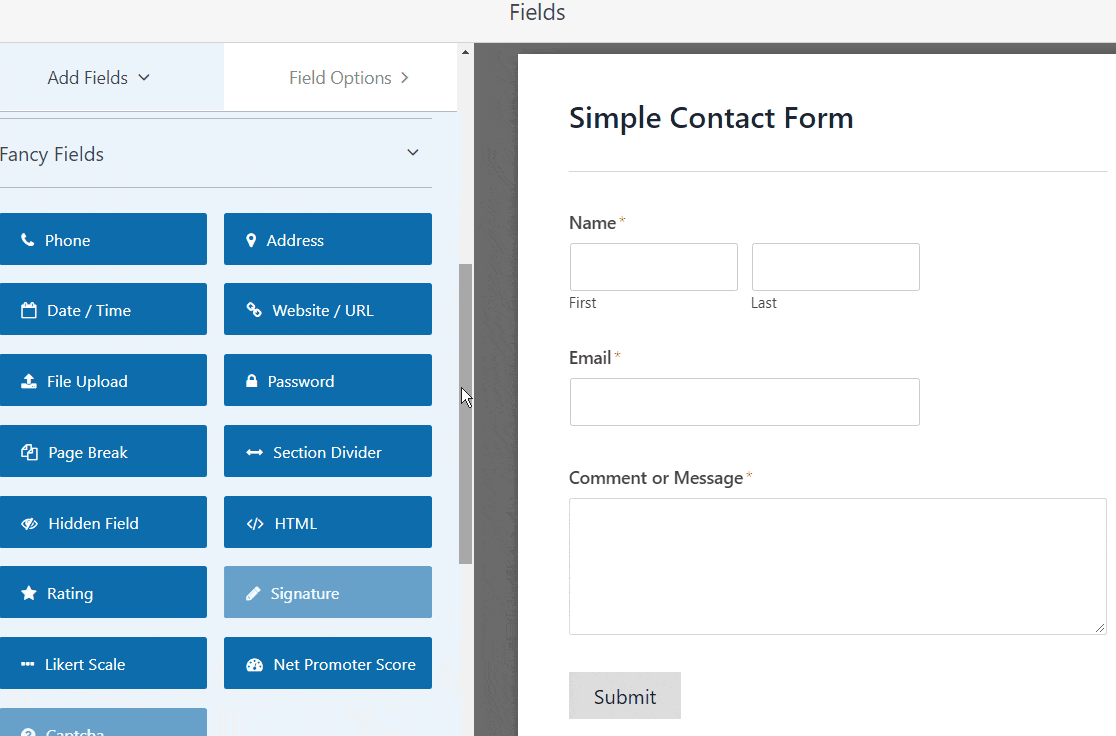
With the File Upload Form template, you lot'll already have the Proper noun, E-mail, Phone, File Upload, and Boosted Comments fields.
Click on any of the course fields to make changes. You tin can also click on a form field and drag it to rearrange the club on your contact form.
You can also add the File Upload field to whatsoever WordPress form y'all create. Just drag the File Upload form field, institute under Fancy Fields, from the left-paw panel of the Form Editor to the correct-hand panel.
You tin click on the File Upload field and also change the:
- Label — Name the form field so your site visitors know what it'southward for.
- Description — Add a description explaining details to users. For example, if you only want people to upload an prototype, tell them that.
- Allowed File Extensions — If yous want to restrict the types of files that tin be uploaded to your WordPress form, put them here, each separated past a comma
- Max File Size — Specify, in megabytes, the max size file you'll allow users to upload. If you leave this blank, WPForms will default to the maximum size limit that'southward allowed by your spider web host. If you need to increment it, see this tutorial on how to increase the maximum file upload size in WordPress.
- Required — If y'all want to require that users upload documents to WordPress before they can submit their grade, select this checkbox.
- Style — You can switch between the default Modernistic manner (recommended) and the Classic mode (which nosotros'll cover in-depth during the next pace)
Wondering where these file uploads volition be stored?
By default, all files uploaded by users are stored in the WPForms binder within the Uploads directory of your site. To make things easier, you can too shop these files in your WordPress Media Library by selecting the Store field in WordPress Media Library checkbox nether Advanced Options.

You can too make forms await groovy by following the steps in our post on how to create a multi-footstep form in WordPress. But for the sake of this tutorial, we'll stick with a single page.
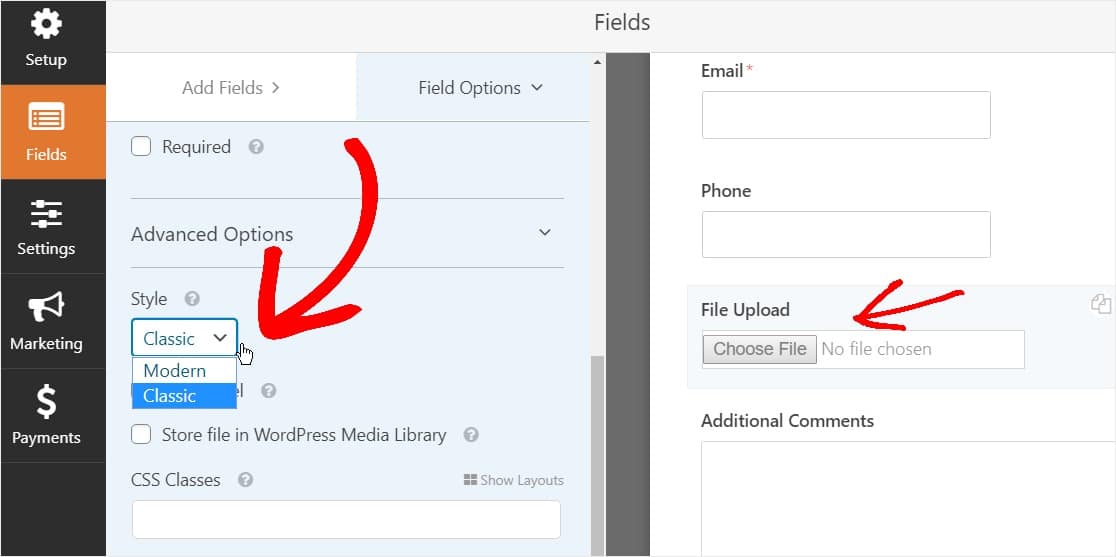
Step 4: Switch to Classic File Upload Field (Optional)
This step is optional and not generally recommended. But, if you'd like to modify the style of the File Upload field from the default Modern style to the Classic style featuring an 'Choose Now' button, head to Advanced Options » Styleand click on the Dropdown to selectClassic.
Switching back to the Classic fashion might be a good choice:
- You or your users prefer a 'button' way File Upload field
- You prefer a more compact File Upload field (and you're but accepting 1 file)
Just continue in mind the Archetype File Upload mode only accepts one upload per field. You'll need to add together another File Upload field to accept multiple uploads on your form if yous're using the Classic style.
To make your form appear ataxia free, y'all'll want to enable conditional logic on the 1st archetype File Upload field before you add together those other fields. That mode, those extra File Upload fields won't prove up on your class unless a user needs them.
Each Classic style of the File Upload field allows users to upload just one single file. To learn how to add together multiple file uploads with the Archetype style uploader field type, read on. If just i file upload field works for yous, you can skip the next pace.
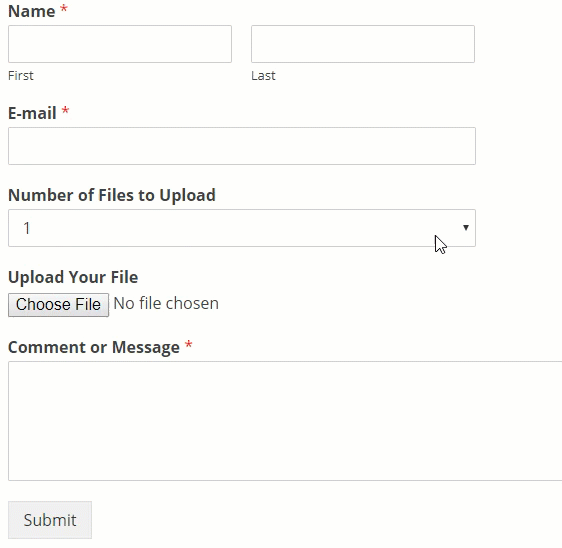
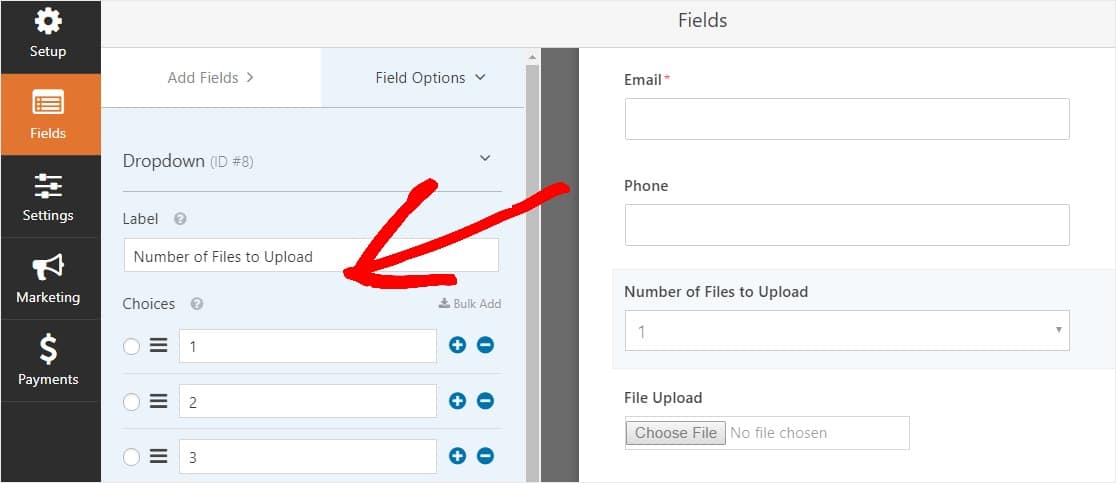
To enable status logic on a Classic style Field Upload field, drag a Dropdown field from the left-paw panel to your course, but above the file upload field. (This volition piece of work with any number of Upload File fields, but for the sake of this example nosotros'll practice iii.)
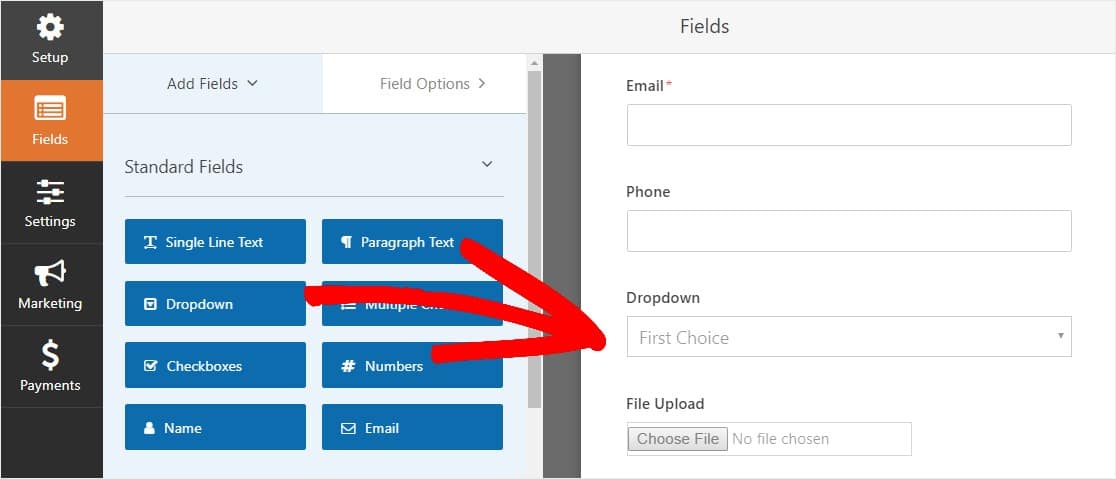
At present click on the dropdown field to come across the Field Options on the left panel and edit the Dropdown field characterization to say Number of Files to Upload and the Choices to say ane, 2, and 3.
Later that, click on the File Upload field and in the options, scroll down to and aggrandize the Conditionals tab in the left-hand panel. So, select the checkmark for Enable conditional logic.
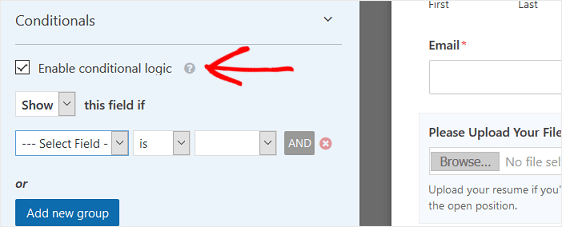
Customize the conditional logic of the File Upload field just like the screenshot below:
Keep in mind that new fields are added by clicking the Add new group button, which applies the OR logic. If you need more than details about using the OR logic, read our guide on how to apply And OR conditional logic.
The next pace is to duplicate this File Upload field.
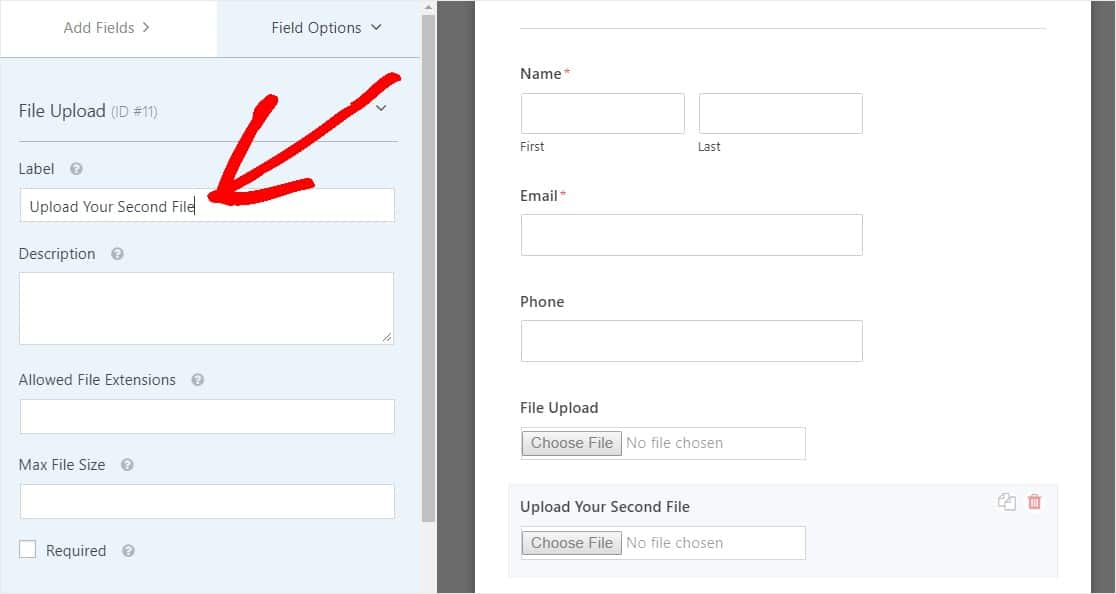
On your course, click on the duplicate icon on the right-manus side of the File Upload field.
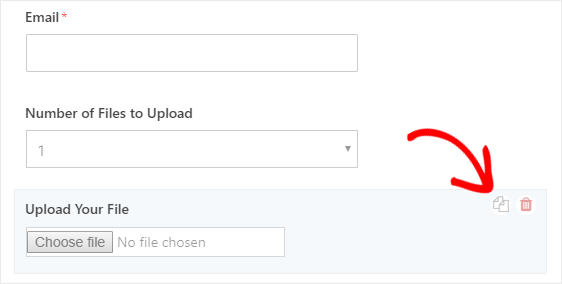
In the left-hand panel, change the characterization of the new File Upload field to Upload Your 2nd File.
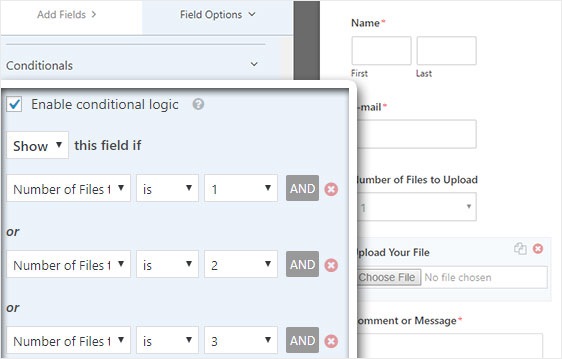
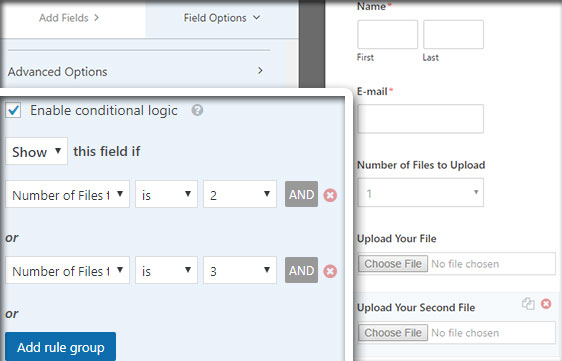
Now configure the conditional logic for this new field just like the screenshot below. The only change from the in a higher place stride is that we removed the offset activity where information technology says the Number of Files to Upload is 1.
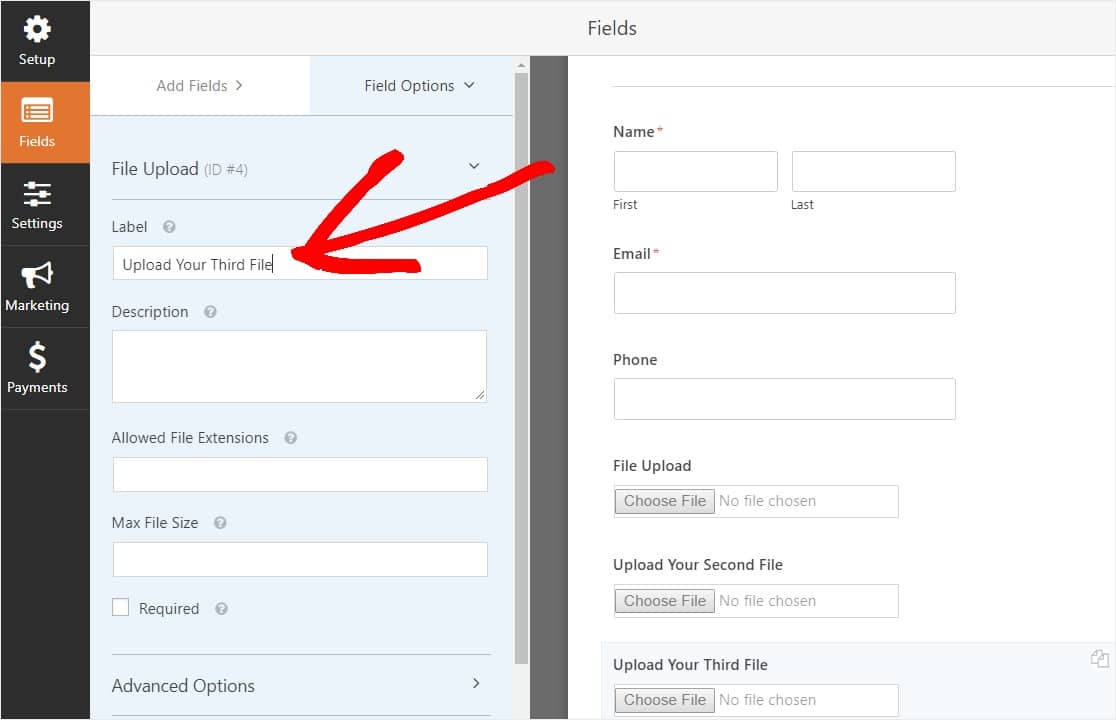
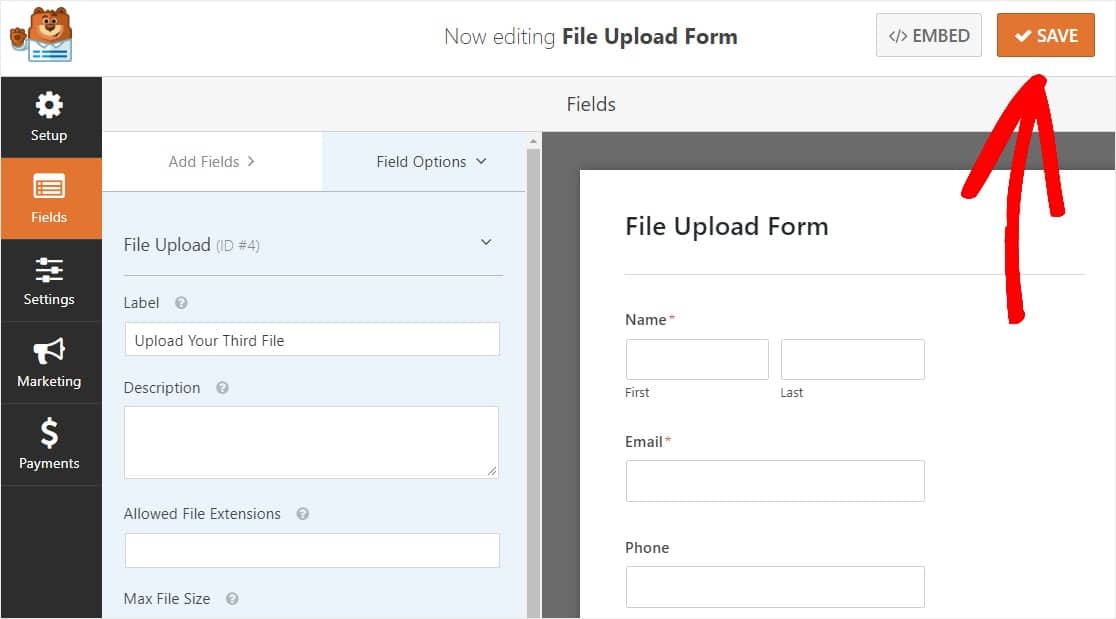
Now, indistinguishable the 2nd file upload field by clicking the icon and changing the label to Upload Your Third File.
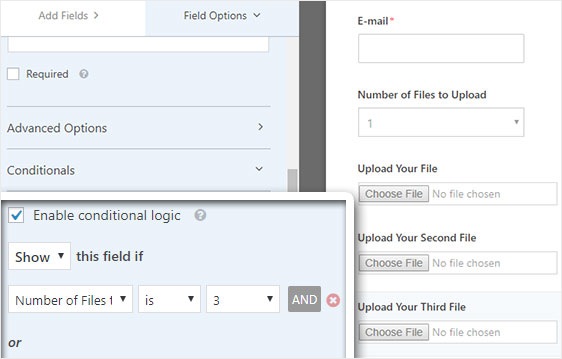
Configure the conditional logic field just like the screenshot below. Nosotros'll only keep the concluding field where it says the Number of Files to Upload is 3.
In one case you lot are done customizing your form, click Save in the top right corner of your screen. You've just added multiple file upload fields to your form.
So as you can encounter, in virtually cases you'll desire to apply the Modern style to accept multiple file uploads.
Then now that you have the right amount of file upload fields on your course (be information technology just ane or multiple), you're ready to configure your form's settings.
Step v: Change Your File Upload Form Settings
You can easily alter the settings for your WordPress contact form with attachments. To start, go to Settings » General.
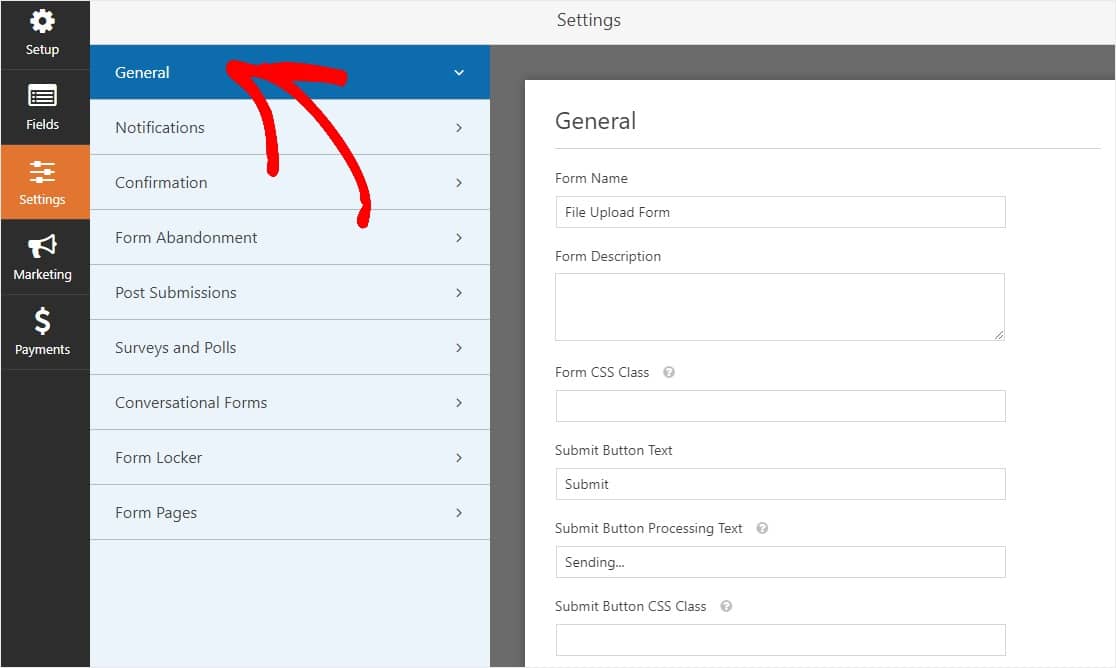
Hither you can configure the post-obit:
- Grade Name— Modify the name of your grade here if you'd like.
- Class Clarification — Give your form a description.
- Submit Button Text — Customize the copy on the submit button.
- Spam Prevention — Stop contact class spam with the anti-spam characteristic, hCaptcha, or Google reCAPTCHA. The anti-spam checkbox is automatically checked on all new forms.
- AJAX Forms — Enable AJAX Multi Upload with no WordPress page reload.
- GDPR Enhancements — You lot tin disable the storing of entry information and user details, such every bit IP addresses and user agents, in an effort to comply with GDPR requirements. Check out our step-by-step instructions on how to add a GDPR agreement field to your unproblematic contact form.
And when you're washed, click Save.
Step vi: Configure Your Form'due south Notifications
Notifications are an splendid manner to know when someone submits one of your file upload forms.
And, unless y'all disable the notification feature, yous'll get an email notification whenever someone submits a form on your site.
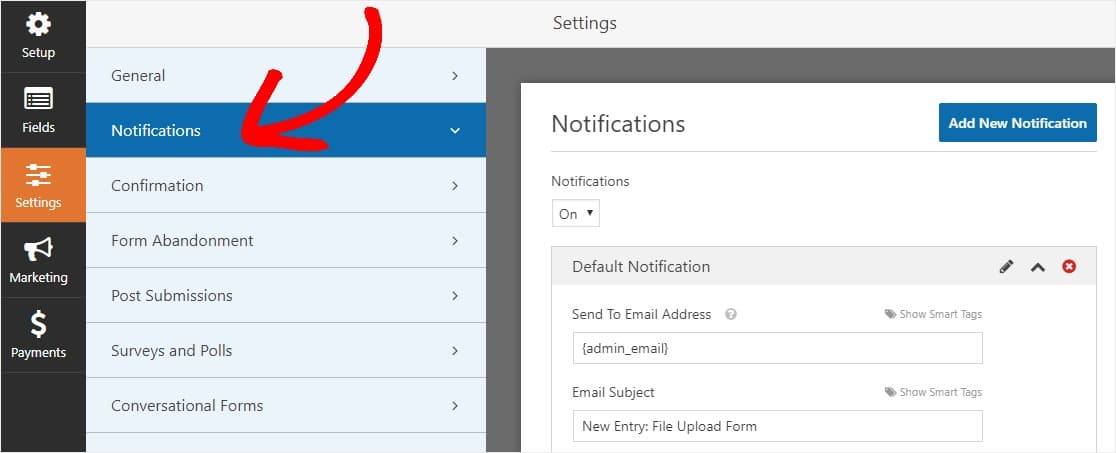
To get an email bulletin when someone completes your form, you'll need to fix form notifications in WordPress and provide your electronic mail address.
Besides, if you use smart tags, you can send a personalized notification to your site visitors one time they stop your class to let them know you received information technology. This assures users their form has gone through properly, along with their file upload.

For more on this, check out our stride past footstep guide on how to send multiple class notifications in WordPress.
In add-on, you have the option to easily brand your notification emails past adding your logo or any epitome you cull in the custom header image area. The logo/image you choose will show upwardly at the pinnacle of email notifications similar the WPForms logo below.
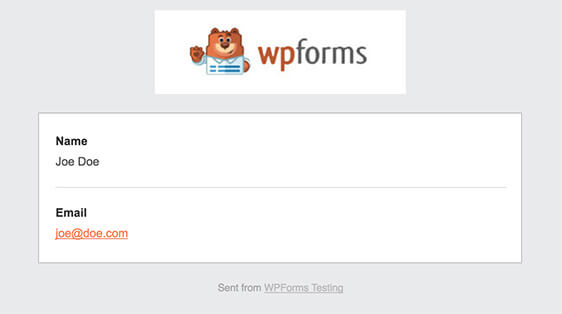
Note: And so since file attachments can often hurt email deliverability, WPForms doesn't adhere your user'southward files in notification emails. Instead, we send the file uploads via electronic mail equally links.
Pace 7: Configure Your File Upload Form Confirmations
Form confirmations are ways to take action immediately (and automatically) afterward your user has submitted information to your grade. For extra assist with this step, check out our tutorial on how to setup form confirmations.
There are 3 different kinds of confirmations in WPForms:
- Message — This is the default confirmation type that appears later someone hits submit on your form, and it's customizable. So if visitors were originally wondering how to add a document to WordPress and so saw a confirmation message, they can rest assured you lot've received it.
- Display Page — Automatically ship users to whatsoever post or folio on your site similar a thank you page
- Redirect — Useful if you desire to have the user to a different website or specialized URL for more complex development.
So permit'southward encounter how to ready a unproblematic form confirmation in WPForms so you tin customize the success message site visitors will see when they submit a form on your site.
To start, click on the Confirmation tab in the Grade Editor under Settings.
Next, select the type of confirmation type you'd like to create. For this example, nosotros'll select Message.

Then, customize the confirmation message to your liking and click Relieve when you're done.
Now you're fix to add your grade to your website.
Step eight: Add Your File Upload Form to Your Website
After you lot've created your form, you demand to add it to your WordPress site.
And WPForms lets you add your forms to multiple places on your WordPress website including your pages, blog posts, and sidebar widgets.
And then allow'southward take a look at the nigh common placement choice: page/mail embedding.
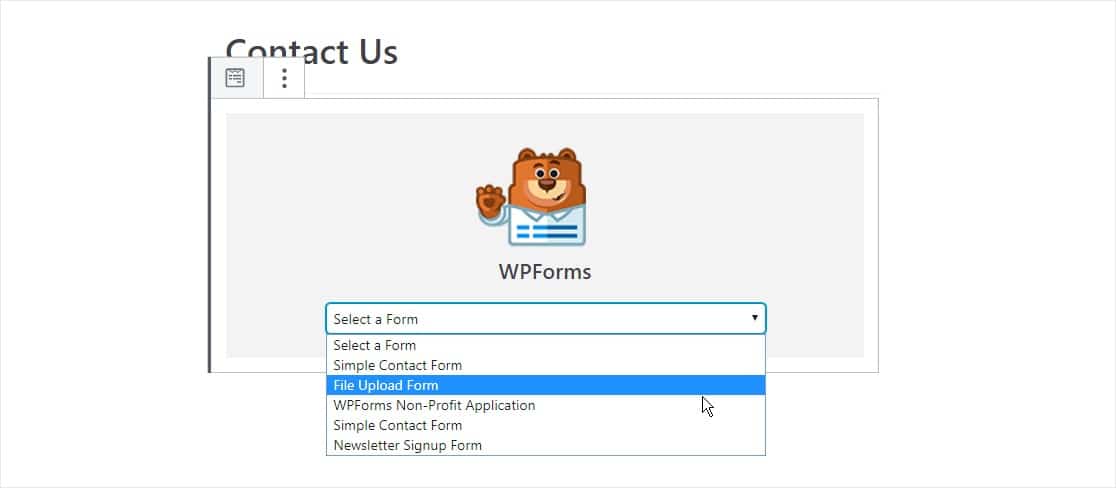
To begin to embed your file upload class, create a new page or postal service in WordPress, or get to the update settings on an existing i. Afterwards that, click inside the first block (the blank area below your page championship) and click on the Add WPForms icon.
![]()
Now, the WPForms widget will appear inside of your cake. Click on the WPForms dropdown and pick the form yous've already created that you want to insert into your page. So select your file upload class.
Yous're one stride close to creating the perfect upload page in WordPress.
Adjacent, click on the blue button in the top right that says either Publish or Update, so your form will announced on your website.
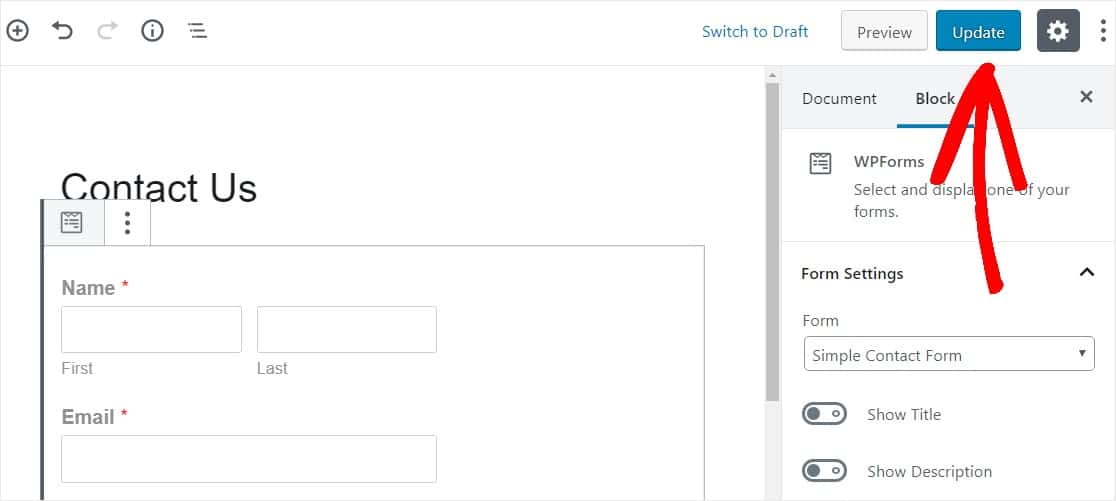
That's it! Your file upload form is now on your website.
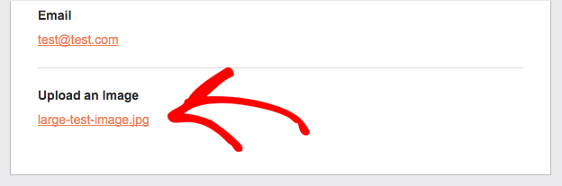
Step nine: View The Files
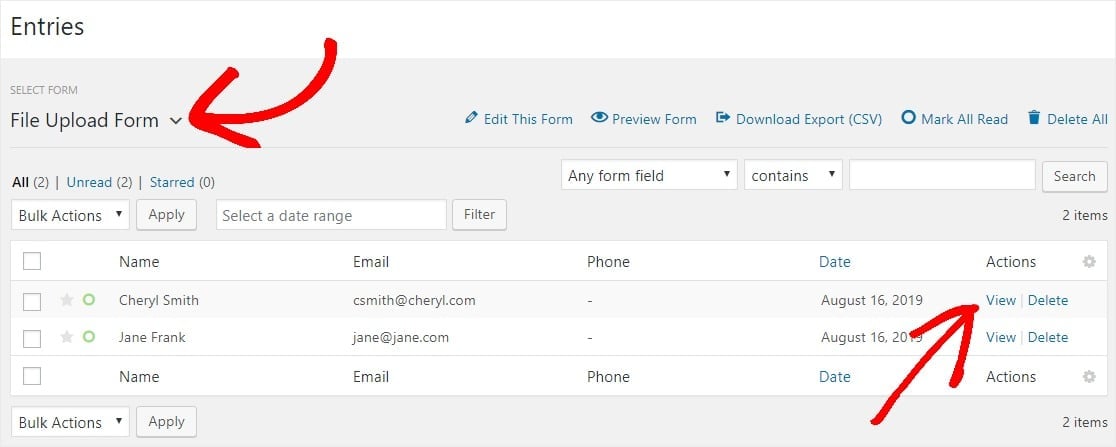
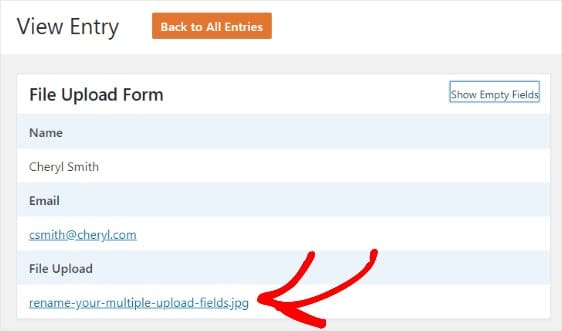
WPForms stores each form submission equally an entry. To view uploaded files, go to WPForms » Entries.
And from there, select the right form from the dropdown menu and click on View.
Side by side, right click the file to download the file, or click to view it in your browser.
Ameliorate notwithstanding, the WPForms WordPress plugin has tons of addons you can install and then you can do more than with your files. For example, you can use our Zapier addon to automatically salve all file uploads to:
- Google Drive
- Dropbox
- and many other cloud storage services.
Click Here to Make Your File Upload Grade Now
And there yous have it! Yous at present know how to create a file upload form with a WordPress plugin.
Next, Create a File Upload Widget in WordPress
If you want to permit site visitors to upload files direct to your website, be sure to check out our helpful guide on how to create a WordPress file upload widget.
So what are you waiting for? Get started with the easiest-to-use WordPress form builder plugin today. WPForms Pro includes a gratis file upload feature and gratis file upload course and offers a xiv-day coin-back guarantee.
And don't forget, if you similar this article, then delight follow us on Facebook and Twitter.
Source: https://wpforms.com/how-to-create-a-file-upload-form-in-wordpress/
0 Response to "How to Make Upload Source Code for a Programming Blog in Wordpress"
Post a Comment